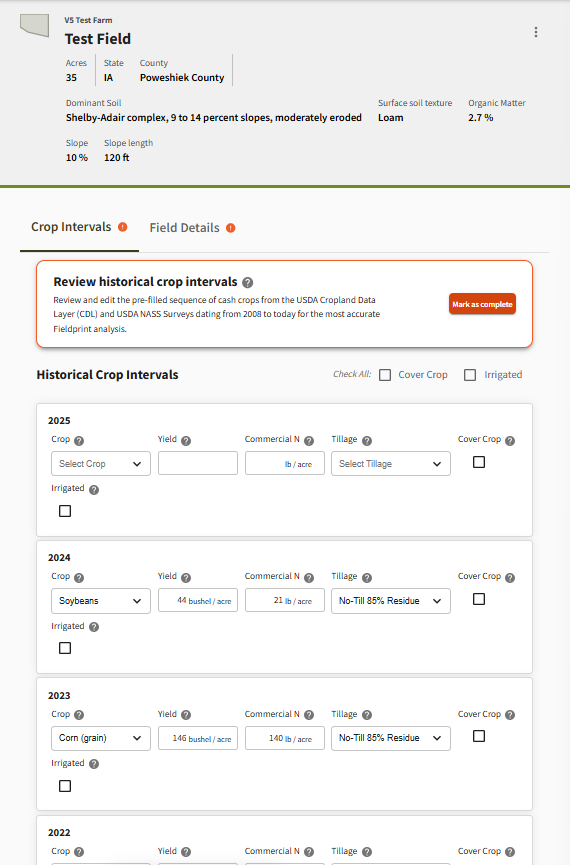
Field History – Historical and Individual Crop Intervals
After saving your Farm and Field, the next step is to review and complete the Field History by verifying the Historical Crop Intervals from 2008 to the current year.
This section is essential to inform the soil carbon model and improve the accuracy of your Fieldprint Analysis.
Review Historical Intervals
Each row on the page represents a single crop year and includes:
- Crop: The primary cash crop pre-filled using USDA Cropland Data Layer (CDL) data
- Yield: A pre-filled estimate in pounds per acre (can be edited if more accurate values are known)
- Commercial Nitrogen (N): Pre-filled rate of synthetic nitrogen applied (editable)
- Tillage: Pre-filled tillage practice (select from dropdown options)
For each year, you also need to:
- Check “Cover Crop” if a cover crop was grown before planting the main cash crop
- Check “Irrigated” if the cash crop in that interval was irrigated
- Add a Double Crop, if a second cash crop was planted after the first in the same year
- Tip: Use the “Check All” boxes at the top to apply cover crop or irrigation selections to every year at once—especially useful if your practices were consistent.
Editing Historical Intervals
- Carefully review the pre-filled data against your records
- Make changes where necessary to reflect your field’s true history
- The more accurate your history, the better your Fieldprint results will be
Complete Review of the Historical Intervals
Once you’ve reviewed and finalized all data from 2008 through the current year:
- Click the “Mark as Complete” button in the orange box at the top and confirm again in the pop-up box.
- You’re now ready to move on to either the Crop Interval or Field Details section
Individual Crop Interval Section
To generate a Fieldprint Analysis or submit data to a Fieldprint Project, you’ll need to complete the full set of required information for each crop interval you want to analyze.
A Fieldprint Analysis is a science-based assessment that uses your field-level data to estimate sustainability outcomes such as soil carbon, energy use, water quality, greenhouse gas emissions, and biodiversity. It helps you track your progress, identify areas for improvement, and demonstrate commitment to sustainability.
Step 1: Review and Add Activities
Click the arrow ( ^ ) next to the crop interval (e.g., 2024 – Rice) to expand it.
In the “Review and Add Activities” section:
- Review pre-filled or migrated activities for accuracy
- Use the “Add Activity” button to enter any missing field operations
- Some activities—like tillage, nutrient applications, and spraying—may occur more than once and need to be added multiple times
Activity types include:
- Planting (Cash Crop)
- Planting (Cover Crop)
- Tillage
- Crop Protectant / Spraying
- Nutrient Application (Manure)
- Nutrient Application (Commercial)
- Nutrient Application (Other Organic Amendments)
- Residue Management
- Harvest
- Irrigation
- Crop Failure / Abandonment
Once all relevant activities are entered, click “Mark as Complete”.
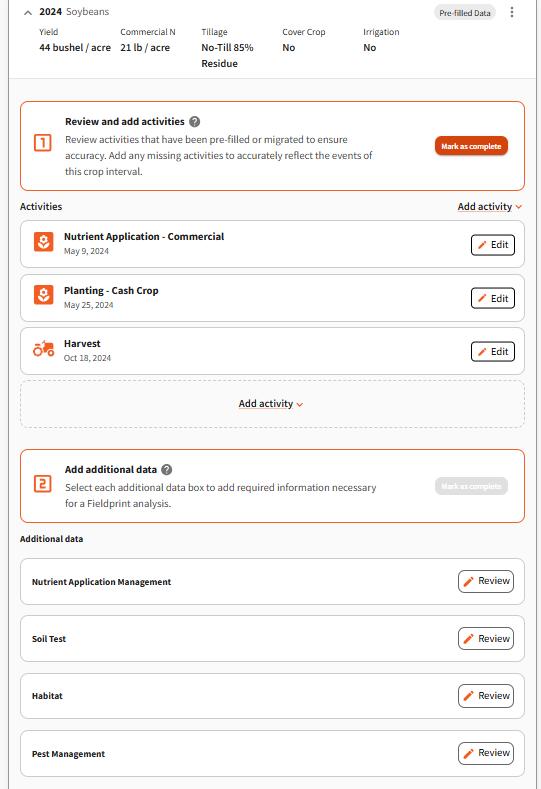
Step 2: Add Additional Data
Next, review and complete the “Additional Data” section. This information is essential for calculating the Fieldprint Analysis.
Click “Edit” next to each section to review and fill in required details:
- Nutrient Application Management
- Soil Test
- Habitat
- Pest Management
- Water Regime and Management (appears only for rice)
Once all required data has been entered, mark this section as complete.
Step 3: Calculate Your Fieldprint Analysis
Ensure that the Field Details Section is complete prior to calculating your Fieldprint Analysis.
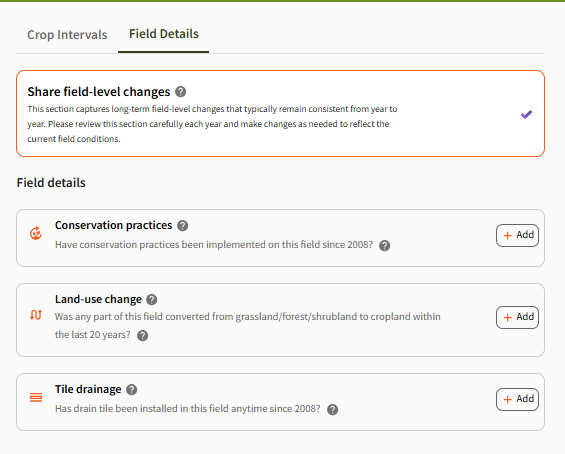
With Field Details, Activities and Additional Data complete, click “Run Analysis.”

This will generate your Fieldprint Analysis, producing sustainability metrics based on your inputs. You can use these results to compare performance over time or against project, state and national benchmarks and identify opportunities to improve.
Step 4: (For those in Fieldprint Projects Only): Enroll in a Fieldprint Project
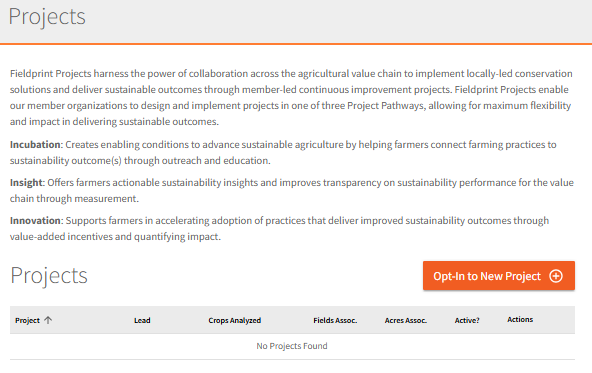
Fieldprint Projects bring together farmers, companies, and other stakeholders to implement locally led conservation solutions through one of three Project Pathways (incubation, insight, innovation), enabling greater sustainability impact. If your field is participating in a Fieldprint Project:
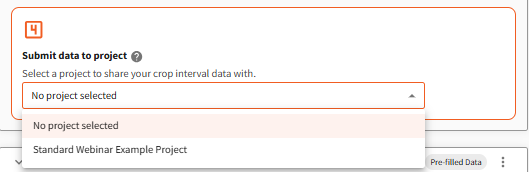
- Click “Enroll in a project”
- Opt-in to your project or select the appropriate project from the dropdown menu (if already enrolled)
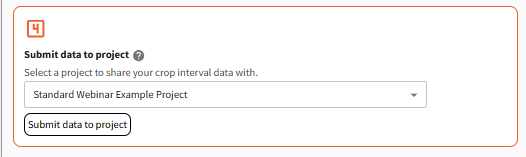
- Navigate back to the crop interval and select the project from the dropdown menu
- Click submit data to project
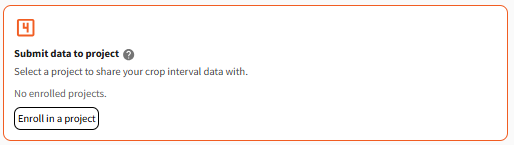
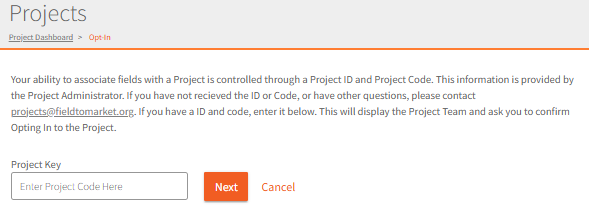
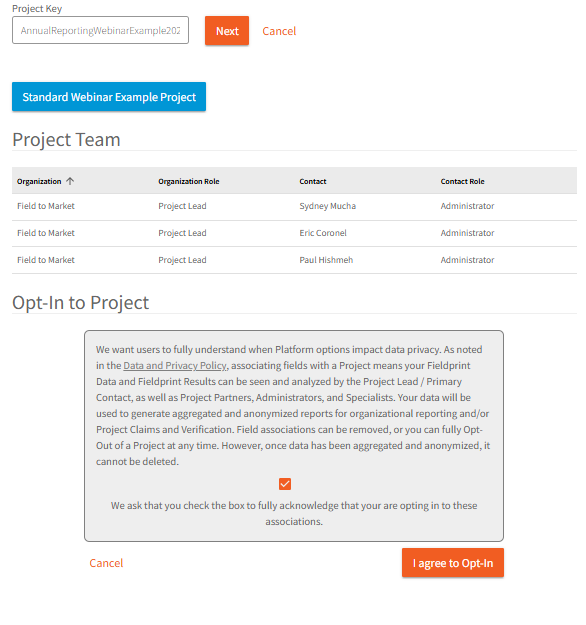
Important: You’ll need a valid Project ID and Project Code provided by your Project Administrator to enroll. If you haven’t received this information or need help, contact: projects@fieldtomarket.org.
Repeat for Each Interval
This full process must be completed for every crop interval that you want included in a Fieldprint Analysis or enrolled in a Project.
0 Comments